9/14/2011

9/13/2011
When to use Interface and Abstract Class
- Interface members cannot have a definition
- All interface members should be implemented by the derived class
- An abstract class can have an instance field in it. The derived classes can assess this field through the base syntax. This is the key difference between abstract and interfaces.
Abstract class can contain non abstract method. When we want that all subclass must implement all methods of base class ;In such situation use interface.In other hand when we want only some method of base class in our subclass then use base class as abstract class because abstract class can contain non-abstract method. Interface:
–> If your child classes should all implement a certain
group of methods/functionalities but each of the child
classes is free to provide its own implementation then use
interfaces.
For e.g. if you are implementing a class hierarchy for
vehicles implement an interface called Vehicle which has
properties like Colour MaxSpeed etc. and methods like
Drive(). All child classes like Car Scooter AirPlane
SolarCar etc. should derive from this base interface but
provide a seperate implementation of the methods and
properties exposed by Vehicle.
–> If you want your child classes to implement multiple
unrelated functionalities in short multiple inheritance use
interfaces.
For e.g. if you are implementing a class called SpaceShip
that has to have functionalities from a Vehicle as well as
that from a UFO then make both Vehicle and UFO as interfaces
and then create a class SpaceShip that implements both
Vehicle and UFO .
Abstract Classes
–> When you have a requirement where your base class should
provide default implementation of certain methods whereas
other methods should be open to being overridden by child
classes use abstract classes.
For e.g. again take the example of the Vehicle class above.
If we want all classes deriving from Vehicle to implement
the Drive() method in a fixed way whereas the other methods
can be overridden by child classes. In such a scenario we
implement the Vehicle class as an abstract class with an
implementation of Drive while leave the other methods /
properties as abstract so they could be overridden by child
classes.
–> The purpose of an abstract class is to provide a common
definition of a base class that multiple derived classes can
share.
For example a class library may define an abstract class
that is used as a parameter to many of its functions and
require programmers using that library to provide their own
implementation of the class by creating a derived class.
Use an abstract class
* When creating a class library which will be widely
distributed or reused—especially to clients, use an abstract
class in preference to an interface; because, it simplifies
versioning. This is the practice used by the Microsoft team
which developed the Base Class Library. ( COM was designed
around interfaces.)
* Use an abstract class to define a common base class
for a family of types.
* Use an abstract class to provide default behavior.
* Subclass only a base class in a hierarchy to which the
class logically belongs.
Use an interface
* When creating a standalone project which can be
changed at will, use an interface in preference to an
abstract class; because, it offers more design flexibility.
* Use interfaces to introduce polymorphic behavior
without subclassing and to model multiple
inheritance—allowing a specific type to support numerous
behaviors.
* Use an interface to design a polymorphic hierarchy for
value types.
* Use an interface when an immutable contract is really
intended.
* A well-designed interface defines a very specific
range of functionality. Split up interfaces that contain
unrelated functionality. |
9/12/2011
When to use Interface
If the requirement is like that something in your design changes frequently then go for interfaces instead of classes .
read more
read more
9/09/2011

9/02/2011
C# Constants
- Constants are immutable values which are known at the compile time.
- They do not change for the life of the program
- C# built in types may be declared as constants
- User-defined types including Classes, structs , arrays cannot be 'const'
- C # does not support const methods,properties or events
- When a complier encounters a const identifier in c# source code, it substitutes the literal value into the intermediate language(IL) code the produces
- Because there is no variable address associated with a constant at run time.
- Constant fields cannot be passed by reference
- Constants are marked by public,private,protected,internal.
What are the types of C# members
Types of C# members:
- Fields
- Constants
- Properties
- Methods
- Constructors
- Destructors
- Events
- Indexers
- Operators
- Nested Types
8/26/2011
Why to use DLL
A DLL is a collection of small programs, which can be called when needed by a larger program that is running in the computer. The small program that lets the larger communicate with a specific device such as printer or scanner is often packged as a a DLL program.
The advantages of DLL:
DLL's don't get loaded in RAM together with the program , so space is saved in RAM(Random Access Memory).
When and if a DLL file is needed, then it is loaded and run. For example, as long as a user of Microsoft Word is editing a document, the printer DLL file does not need to be loaded into RAM. If the user decides to print the document, then the Word application causes the printer DLL file to be loaded and run.
The advantages of DLL:
DLL's don't get loaded in RAM together with the program , so space is saved in RAM(Random Access Memory).
When and if a DLL file is needed, then it is loaded and run. For example, as long as a user of Microsoft Word is editing a document, the printer DLL file does not need to be loaded into RAM. If the user decides to print the document, then the Word application causes the printer DLL file to be loaded and run.
8/24/2011
Why do we need Try-Finally block
The output that the code in the finally block will be executed after throwing the exception. However, the last statements in the program that followed the finally block will not be executed. This means that the exception
prevents control from being transferred to any part of the program except the finally block.
using System;
public class MyClass
{
static void Main()
{
string myString = "Finally";
object myObject = myString;
try
{
// The following conversion is invalid.
// It throws an exception.
int myInt = (int)myObject;
}
finally
{
// The code in this block is always executed:
Console.WriteLine("The program continues and ends here:");
Console.WriteLine("My String is: {0}", myString);
}
// The following code will not be executed:
Console.WriteLine("Hello again!");
}
}
It is also used for cleaning up the resource, like to close the open file stream..
8/07/2011
8/05/2011
8/04/2011
8/03/2011
7/31/2011
How to create an Assembly in .Net
I will show here how to create a simple dll in .net using visual studio 2010, and to link it with other exe.
This may help a .net newbie like me.
Step 1: Create a class library


Step 2: Create a Console application

Step 3: Link the dynamic library

Use add() and sub() methods

Step 4: Build and Run the project

read more
This may help a .net newbie like me.
Step 1: Create a class library

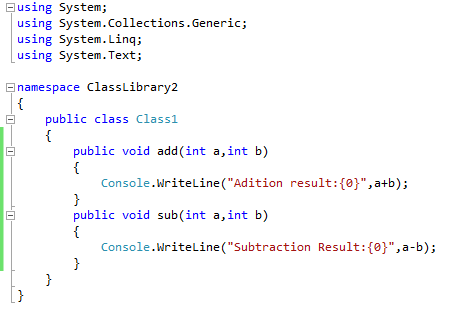

Step 3: Link the dynamic library


Step 4: Build and Run the project

read more
7/28/2011
Learn Microsoft's PowerShell
Nice tutorial on Power shell: read
Why do we need PowerShell:
Traditionally, an Administrator would launch the GUI, select the service, and then either stop or start it. Doesn't seem like a big deal until you are asked to stop a service on multiple computers. Through PowerShell Scripting you will be able to start, stop, and change status types of a service on multiple computers without much effort. Write a script, run-it, and then kick you feet up on the desk.
Why do we need PowerShell:
Traditionally, an Administrator would launch the GUI, select the service, and then either stop or start it. Doesn't seem like a big deal until you are asked to stop a service on multiple computers. Through PowerShell Scripting you will be able to start, stop, and change status types of a service on multiple computers without much effort. Write a script, run-it, and then kick you feet up on the desk.
7/22/2011

6/03/2011
Step by Step WCF example
Step by step procedure to create WCF:
A.Creating the service (Server side)
Step 1: Open Visual Studio 2010 and create project ,choose "Windows Service Application", and give a name to your project say MyService.
Step 2: Open IService.cs , in that you can see [ServiceContract] where your intetface name is declared and [OperationContract] here you function contract should be defined here (note: delete the default functions if they are not needed), initialize you addData function here

Step 3: Open Service1.svc.cs and add the code for the addData function, ( note: delete the default functions if they are not needed)

Step 4: Declare your endpoint in web.config file add the below code which is in bold and Italics.

Step 5:Save the project and run it

B. Creating the client to consume the service (Client side):
Step 1: Open another Visual studio 2010 , create a new ASP.net web application.right click the project and go to 'Add Service reference' ,copy and paste the service url and press OK
Step 2: Open Default.aspx , create a simple button and lable controls
Step 3: Double click the button and add this following code

Ste 4: Build and run the project ,now your client has comsumed the services!!

read more
msdn :http://msdn.microsoft.com/en-us/library/ms734712.aspx
A.Creating the service (Server side)
Step 1: Open Visual Studio 2010 and create project ,choose "Windows Service Application", and give a name to your project say MyService.
Step 2: Open IService.cs , in that you can see [ServiceContract] where your intetface name is declared and [OperationContract] here you function contract should be defined here (note: delete the default functions if they are not needed), initialize you addData function here


Step 4: Declare your endpoint in web.config file add the below code which is in bold and Italics.

Step 5:Save the project and run it

B. Creating the client to consume the service (Client side):
Step 1: Open another Visual studio 2010 , create a new ASP.net web application.right click the project and go to 'Add Service reference' ,copy and paste the service url and press OK
Step 2: Open Default.aspx , create a simple button and lable controls
Step 3: Double click the button and add this following code

Ste 4: Build and run the project ,now your client has comsumed the services!!

read more
msdn :http://msdn.microsoft.com/en-us/library/ms734712.aspx
Subscribe to:
Posts (Atom)